Build Smarter Docs: The Beginner’s Guide to Variant Management
Learn how to streamline multi-product docs and reduce maintenance overhead
Professional technical writers often deal with several variants of documents.
Whenever similar products need documentation, content reuse simplifies your life.
But sometimes, content reuse alone will not be enough. Cloning minimally different topics or text fragments is not only tedious, it’s also error-prone and inefficient.
Mastering variant management will reduce your source files to the absolute minimum, reducing efforts and cost.
Variants vs. Versions
Before I jump into explaining variant management in DITA, let me explain what variants are.
Many people who are not working in software (sometimes even those), mistake variants for versions. So let’s clear up the terminology first.
Variants are entities of an object that share a common basis but have distinctive features.
Versions are temporal states of an object. Every new iteration of the object is a new version.
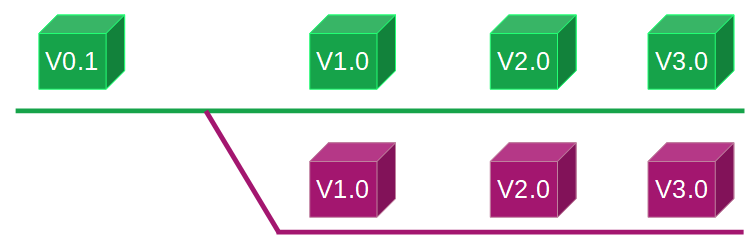
An illustration should help us understand it clearly:
The green square is our initial product. As it is improved, it gains new versions (from left to right).
At the same time, a customer requested the same product, but in magenta. Otherwise, it is the same square. This is a product variant.
Variants in Documentation
The same principle applies to user documentation. User documentation can come with several variants.
An example: You could write a task topic that applies to two products. The sequence of steps is the same. The only difference is the product name.
There are two ways to solve this issue:
Create two different topics and reuse all content that is identical for both topics.
If the variant-specific differences within a topic are marginal, this is not efficient.Create one topic and mark up the variant-specific parts, also called conditional text.
This is the efficient approach and exact purpose of variant management in documentation: To keep your manual efforts down.
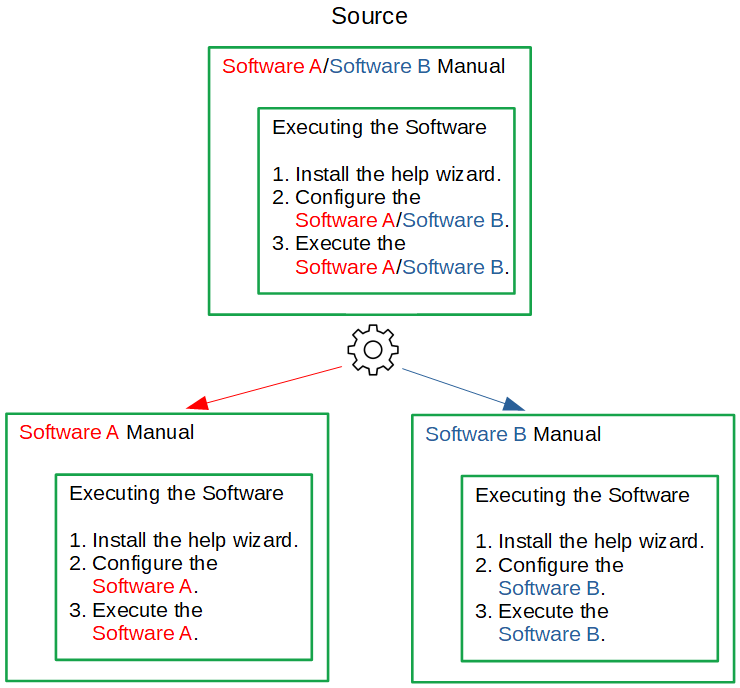
Let me illustrate option 2:
The source contains the text that applies to both variants (black font) and the variant-specific parts (red and blue).
When generating the documentation, you tell your engine (e.g., DITA OT) to filter out (or in) whatever you need in the final documentation.
This way, you can generate two documentation variants from the same source.
Variant Management With DITA
As a professional standard for user documentation, DITA natively supports variant management.
To mark up conditional text, DITA uses XML attributes. You can apply these attributes to whatever XML tag you like.
DITA supports the following conditional attributes:
productVariants of products, e.g., “adobe reader” or “adobe acrobat”platformTarget platform, e.g., "windows", "linux"audienceTarget audience,e.g., "admin", "user"revRevision or versioning indicatorotherpropsGeneric classification with no semantics. Intended for ad hoc, informal flags or custom conditions, e.g., “internal-beta”.
You would mark up your content like this:
<p product="product_A product_B" audience="admin novice">Some content</p>You can see that you can apply several attributes to one element. And each attribute can have multiple values. Each value is separated by a space character.
Imagine you're documenting a printer that comes in a Home and Pro model. The setup steps are the same except for the final step. Using conditional text, you can write a single topic and mark the last step with audience='home pro' as needed.
Defining What to Include in the Document
To control which XML tags are to be included or excluded, you create a DITAVAL file. It may look something like this:
<prop att="product" val="product_A" action="include"/>
<prop att="audience" val="novice" action="include"/>
When you generate your document and reference this DITAVAL file as a filter using the command line, the paragraph above would be included.
The processing works like this:
If 1 value within the same attribute is defined to be included in the DITAVAL file, the element will be included.
In computer-science lingo: For the space-separated values within the same attribute, DITA applies a logical “OR”.If you have multiple attributes, e.g., product and audience, at least one of the values within each attribute must be true.
DITA applies a logical “AND”.
Complicated? Only in theory!
Let’s take a look at how this works in practice and how to simplify your generation process with project files.
Keep reading with a 7-day free trial
Subscribe to A Linguist's Tech Conquest to keep reading this post and get 7 days of free access to the full post archives.


